How to Clean Mold from Bathroom Ceiling and Keep It Away for Good?
You look up while taking a shower and notice small dark spots spreading across the ceiling. At first, you think it’s just dirt. Then you smell that musty, damp odor that won’t go away. That’s when you realize it’s mold. Don’t worry—you’re not the only one dealing with it. Bathroom ceilings are one of the most common places where mold likes to grow.
Mold loves moisture, warmth, and something to feed on. Bathrooms have all three. Hot showers fill the air with steam, and if the fan isn’t strong enough, that moisture stays trapped. Warm, wet air meets the cooler ceiling, creating tiny water droplets—perfect for mold. Even small leaks from pipes or a roof can keep the ceiling damp and make things worse.
At first, mold may seem like just a small stain. But if you ignore it, it can cause real problems. Mold can trigger sneezing, coughing, and breathing issues, especially for people with allergies or asthma. It can also damage your ceiling paint or drywall, making repairs costly later. And that musty smell? It spreads easily, making your bathroom feel dirty even when it’s clean.
The good news is that you can fix it—and prevent it from coming back. In this guide, you’ll learn how to clean mold from your bathroom ceiling using both natural and chemical solutions. We’ll cover easy, safe methods like vinegar and baking soda, and stronger ones like bleach for tougher spots. You’ll also learn how to protect yourself while cleaning and how to stop mold from growing again.
By the end of this guide, you’ll know exactly how to remove mold from your bathroom ceiling safely, keep your bathroom fresh, and make sure those dark spots never return.
What Causes Mold on Bathroom Ceilings?
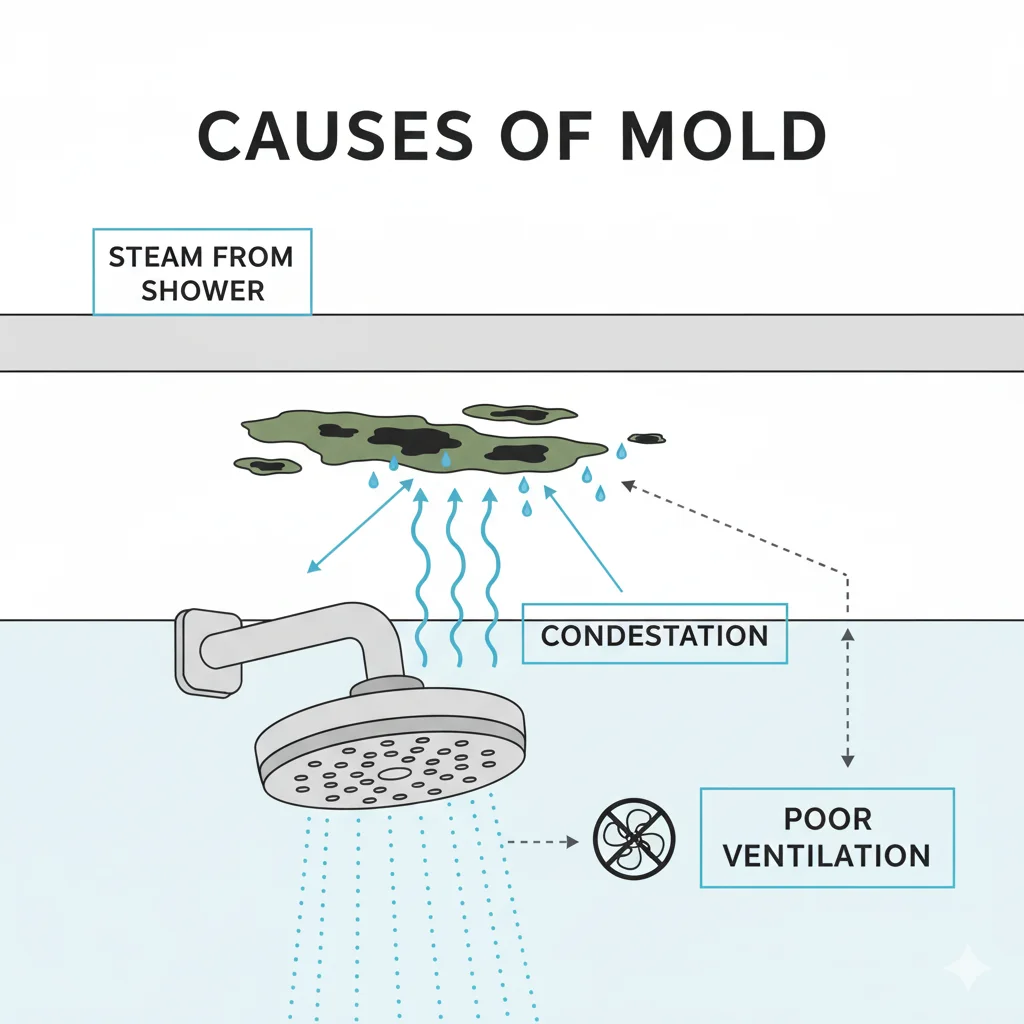
Mold doesn’t just appear out of nowhere — it grows when the environment is just right. The science behind it is simple: moisture + poor ventilation + organic material = mold growth. Bathrooms have all these factors, which is why they’re one of mold’s favorite places to grow.
When you take a hot shower, the steam fills the air with moisture. If that steam can’t escape, it clings to cooler surfaces like your ceiling and walls. Over time, that damp surface becomes a perfect home for mold spores floating in the air. Once they find a spot to settle, they grow fast—especially if the ceiling paint or drywall provides organic matter for them to feed on.
Here are the most common reasons mold grows on bathroom ceilings:
Inadequate exhaust ventilation: If your bathroom fan isn’t strong enough or you forget to turn it on, humidity stays trapped.
Steam buildup after showers: Long, hot showers release a lot of moisture that sticks to the ceiling.
Leaking pipes or roof: Even a tiny leak above your ceiling can keep that area damp without you realizing it.
Poor insulation or condensation: When warm, humid air hits a cold ceiling, it creates condensation—small water droplets that mold loves.
Over time, these small moisture problems can turn into large mold patches if not addressed quickly. Understanding what’s causing the moisture helps you fix the problem at its root, not just clean the surface.
Pro Tip 1: If the mold appears near vents or spreads evenly across the ceiling, poor ventilation is likely the cause. But if you see dark, damp spots forming in one specific area—especially near corners or light fixtures—it could be a hidden plumbing or roof leak.
Is Bathroom Ceiling Mold Dangerous?
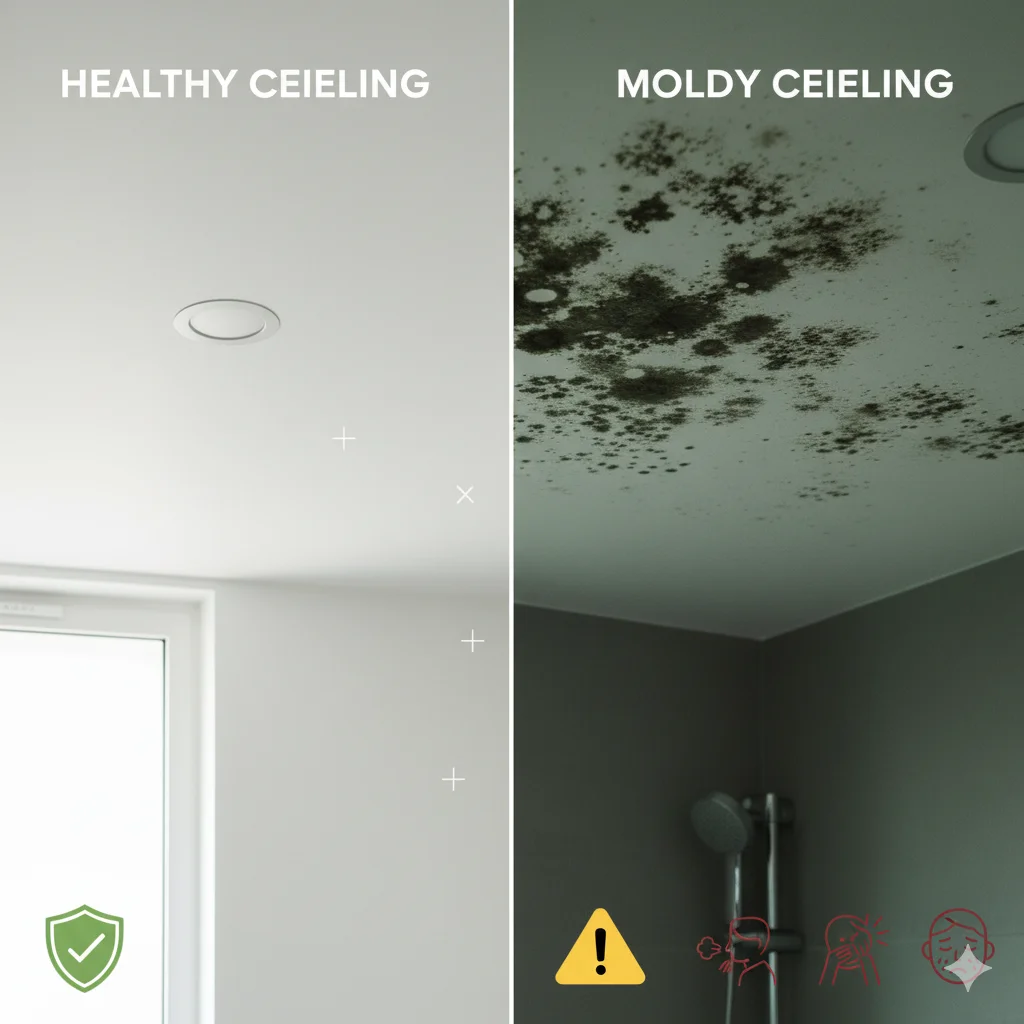
Mold on your bathroom ceiling is more than just an eyesore. It can affect your health, especially if you are sensitive to allergens or have respiratory conditions. Exposure to mold can cause coughing, sneezing, itchy eyes, nasal congestion, and even trigger asthma attacks. Long-term exposure may worsen respiratory problems and make breathing uncomfortable for everyone in the household.
Not all growths are equally harmful. Mildew, for example, is usually surface-level and often looks like a thin, white or gray layer. It can be cleaned fairly easily and doesn’t penetrate deeply into materials. Mold, on the other hand, tends to grow deeper into paint, drywall, or wood. This makes it harder to remove and potentially more dangerous, especially if it spreads unnoticed over time.
Knowing when to call a professional is important. If the mold covers more than 10 square feet, keeps coming back despite repeated cleaning, or shows signs of water damage behind the ceiling, it’s time to get expert help. Professionals can safely remove extensive mold, repair the underlying cause, and prevent it from returning.
Pro Tip 2: Certain molds, like black mold (Stachybotrys), need both moisture and cellulose to grow. This means the type of ceiling material and paint matters. Mold is more likely to thrive on porous surfaces such as drywall or untreated wood compared to glossy, non-porous paint. Choosing the right materials and keeping them dry can make a huge difference in preventing future growth.
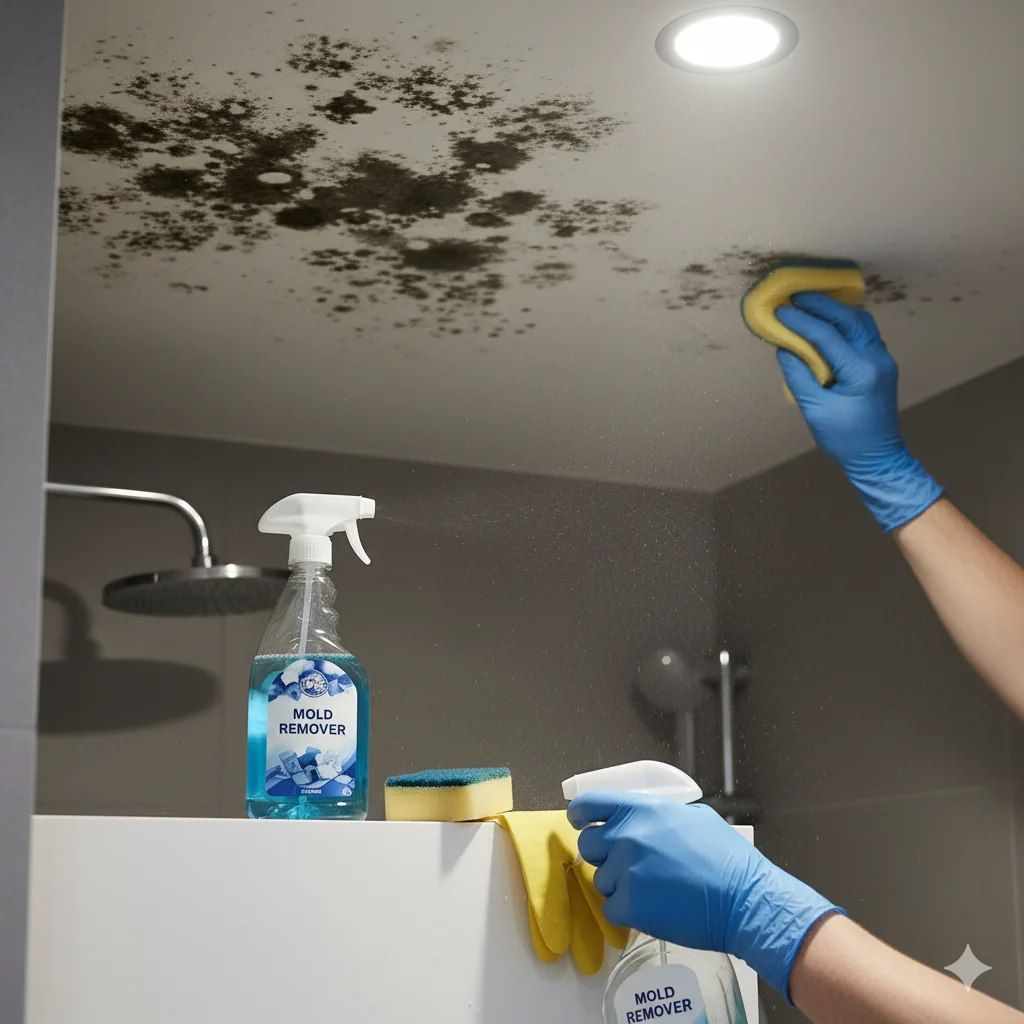
Tools and Materials You’ll Need
Before you start cleaning mold from your bathroom ceiling, having the right tools and materials is essential. Using proper solutions, protective gear, and cleaning tools makes the process safer, faster, and more effective.
Cleaning Solutions
You don’t always need harsh chemicals to remove mold. Some common cleaning solutions work well depending on the severity of the mold:
Vinegar: A natural, eco-friendly option that kills most mold spores and is safe for regular use.
Baking Soda: Gentle and effective for light mold, it also helps neutralize odors.
Bleach: Powerful and works well on tough, stubborn mold, but should be used with caution and proper ventilation.
Hydrogen Peroxide: Another natural alternative that works on porous surfaces and helps disinfect the area.
Commercial Mold Removers (optional): These can be convenient for severe mold but often contain strong chemicals.
Choose solutions based on your needs: natural options for light or recurring mold, stronger chemicals for stubborn patches.
Protective Gear
Safety is key when dealing with mold. Even mild mold can irritate your skin, eyes, and lungs. Make sure you have:
Gloves, goggles, and an N95 mask to protect hands, eyes, and lungs.
Long sleeves and old clothes that can get dirty or wet.
Proper ventilation, such as an exhaust fan or open window, to keep fumes and spores from lingering in the air.
Wearing the right gear ensures you can clean thoroughly without harming yourself.
Cleaning Tools
Having the right tools makes the cleaning process smoother and more efficient:
Ladder or step stool to safely reach the ceiling.
Spray bottle for applying cleaning solutions evenly.
Soft scrub brush or sponge for scrubbing without damaging the ceiling paint.
Microfiber cloths to wipe surfaces clean and absorb moisture.
Bucket and warm water for rinsing tools and the cleaned area.
With these tools and materials ready, you can tackle bathroom ceiling mold safely and effectively while preventing it from spreading.
How to Prepare Before Cleaning?
Proper preparation is crucial before tackling mold on your bathroom ceiling. Following these steps ensures your safety, protects your bathroom, and makes the cleaning process more effective.
Step 1: Ensure Electrical Safety
Turn off the bathroom lights and ceiling fans if the mold is near electrical fixtures. Water and cleaning solutions can conduct electricity, so this step prevents accidental shocks while working.
Step 2: Remove and Protect Personal Items
Clear the bathroom of towels, toiletries, rugs, and any personal items. Cover sinks, counters, and fixtures with plastic sheets or old towels to prevent splashes or damage from cleaning solutions.
Step 3: Ventilate the Area
Open windows and doors to create proper airflow. Ventilation helps reduce airborne mold spores and disperses fumes from cleaning solutions, whether natural or chemical. Running an exhaust fan during cleaning is also recommended.
Step 4: Test a Small Area First
Before applying any cleaning solution to the entire ceiling, test a small, inconspicuous spot. This ensures that the solution won’t damage paint, wallpaper, or ceiling materials, avoiding unnecessary repairs later.
Pro Tip 3: Check for leaks, condensation, or other sources of excess moisture. If mold is caused by a leaking pipe, roof damage, or poor insulation, fix the problem first. Cleaning without addressing the source will only lead to mold returning.
By following these professional preparation steps, you create a safe, controlled environment for mold removal. Proper preparation not only protects your health and belongings but also improves the effectiveness and longevity of your cleaning efforts.
Best Solutions for Cleaning Mold from Bathroom Ceilings
Choosing the right solution is essential for effectively removing mold from your bathroom ceiling. Depending on the severity of the mold and the type of ceiling surface, you can use natural, eco-friendly options or stronger chemical solutions. Each method comes with its own benefits and precautions, so knowing how to mix, apply, and when to use each one will help you get the best results.
Vinegar Solution (Natural & Safe)
Vinegar is a simple, natural, and effective solution for mild mold. Its acidic nature kills over 80% of mold species, making it a great first step for recurring or light mold growth.
How to use:
Pour undiluted white vinegar into a spray bottle.
Spray the moldy ceiling generously and allow it to soak for at least 1 hour.
Gently scrub the area with a soft brush or sponge to remove mold stains.
Rinse the surface lightly with water and dry completely using a microfiber cloth or towel.
Ideal for:
Mild or recurring mold patches.
Homes with children or pets where harsh chemicals are not preferred.
Vinegar is non-toxic and safe for most painted surfaces, making it an excellent preventive measure when used regularly.
Baking Soda Paste
Baking soda is another natural solution that works well for light mold while also neutralizing odors.
Recipe and use:
Mix 1 tablespoon of baking soda with enough water to form a thick paste.
Apply the paste directly to the moldy area.
Scrub gently with a sponge or brush to remove mold.
Rinse the area with warm water and allow it to dry completely.
Benefits:
Helps deodorize the bathroom.
Prevents mold from returning quickly.
Safe on most painted ceilings and eco-friendly.
Bleach Solution (Powerful but Cautious)
Bleach is highly effective at killing stubborn mold but requires extra caution. It is especially useful for severe mold infestations or ceilings with non-porous paint.
Recipe and use:
Mix 1 cup of bleach with 1 gallon of water.
Wear gloves, goggles, and ensure proper ventilation while using bleach.
Apply the solution to the moldy ceiling and allow it to sit for 10 minutes.
Scrub gently to remove mold stains.
Rinse thoroughly with water and dry the surface completely.
Warnings:
Not suitable for porous surfaces; bleach can damage drywall or paint.
Never mix bleach with vinegar or ammonia—it produces toxic fumes.
Use only in well-ventilated areas to avoid inhaling fumes.
Hydrogen Peroxide (Eco-Friendly Alternative)
Hydrogen peroxide is a safe, natural option that works on light mold and helps disinfect surfaces. It is ideal for ceilings with light paint or sensitive finishes.
How to use:
Use a 3% hydrogen peroxide solution in a spray bottle.
Spray the moldy area generously and let it sit for 10 minutes.
Scrub gently with a brush or sponge to remove the mold.
Wipe with a clean cloth and allow the ceiling to dry completely.
Ideal for:
Eco-conscious cleaning.
Light mold growth where bleach may be too harsh.
Preventing mold recurrence when used periodically.
By selecting the right cleaning solution based on your ceiling type and mold severity, you can remove mold effectively and safely. Using natural solutions like vinegar or baking soda is perfect for regular maintenance and minor mold, while bleach or hydrogen peroxide works well for more persistent infestations. Proper application, soaking, scrubbing, and drying are key steps to ensure the mold does not return.
Step-by-Step: How to Remove Mold from Bathroom Ceiling
Removing mold from your bathroom ceiling may seem intimidating, but following a step-by-step approach makes the process simple, safe, and effective. Here’s how to tackle it like a pro.
Step 1 – Gear Up & Ensure Safety
Before touching any mold, put on the proper protective gear. Wear gloves, goggles, an N95 mask, and long sleeves to protect your skin, eyes, and lungs. Open windows or run the exhaust fan to ensure good ventilation. Safety is the first step—never skip it.
Step 2 – Choose Your Cleaning Solution
Select the solution based on the type of ceiling and the severity of the mold. Use vinegar or baking soda for light, recurring mold. For stubborn or larger patches, bleach or hydrogen peroxide may be more effective. Knowing your solution helps prevent damage to your ceiling while removing mold thoroughly.
Step 3 – Apply and Let It Sit
Apply your chosen cleaning solution evenly across the moldy area. For sprays, coat the surface fully. For pastes, spread a thin layer over the spots. Allow the solution to soak for the recommended time—usually 10–60 minutes depending on the solution. Don’t rush this step; the soak time allows the mold to die and makes it easier to remove.
Step 4 – Scrub Gently
After the solution has soaked, gently scrub the ceiling with a soft brush or non-abrasive sponge. Avoid harsh scrubbing, which can damage paint or drywall. Focus on removing visible mold while keeping the surface intact.
Step 5 – Rinse and Dry Thoroughly
Rinse the area with clean water if needed, then dry completely using a microfiber cloth or towel. Moisture left behind can allow mold to grow again, so drying is just as important as cleaning.
Step 6 – Optional: Repaint with Mold-Resistant Paint
If the ceiling paint is old, peeling, or stained, consider repainting with an anti-mold primer after it’s fully dry. This provides an extra layer of protection and helps prevent future mold growth.
Following these six steps ensures that mold is removed effectively, your ceiling stays intact, and the risk of recurrence is minimized.
How to Prevent Mold from Returning?
Preventing mold is always easier than constantly cleaning it. Once you’ve removed mold from your bathroom ceiling, creating habits and making small improvements can stop it from coming back. Focusing on moisture control, ventilation, and regular maintenance ensures a clean, healthy bathroom for the long term.
Control Humidity
Mold thrives in damp conditions, so keeping humidity low is crucial. Aim to maintain humidity levels between 40–50%. You can achieve this by:
Using a dehumidifier during humid months.
Placing moisture absorbers in corners or on shelves to capture excess water.
Avoiding long, unventilated showers when possible.
Improve Ventilation
Good airflow helps moisture evaporate quickly and keeps mold from forming. Some effective methods include:
Installing or upgrading exhaust fans to remove steam during showers.
Keeping the fan running for at least 20 minutes after every shower.
Opening windows regularly to allow fresh air in and moisture out.
Fix Leaks & Insulation Issues
Even small leaks or condensation can encourage mold growth. Regularly check for:
Leaks in pipes, light fixtures, or roof areas above the ceiling.
Cracks in tiles, grout, or around vents that can trap water.
Poor insulation that causes condensation on the ceiling surface.
Keep Surfaces Dry
Simple habits can prevent mold from returning quickly.
Wipe down ceilings and walls after long, hot showers.
Encourage family members to leave the bathroom door open post-use for better airflow.
Use a squeegee on tiles and walls to reduce lingering moisture.
Use Mold-Resistant Paint & Cleaners
Applying mold-resistant paint or primer when repainting helps prevent future outbreaks. You can also use preventive sprays:
Spray a vinegar mist on ceilings and corners every few months to inhibit mold growth naturally.
Keep cleaning routines light but consistent to maintain a healthy surface.
When to Call a Professional?
Not all mold problems can be handled safely at home. Sometimes, calling a professional is the best choice to protect your health, your home, and prevent further damage. Here’s when you should consider expert help:
Large Mold Infestations
If the mold covers more than 10 square feet, it’s considered a serious problem.
Cleaning large areas yourself can be risky and difficult, especially on ceilings or high surfaces.
Professionals have the right tools and protective gear to remove mold safely and thoroughly.
Persistent Mold
If mold keeps returning despite multiple cleanings, there may be an underlying moisture problem.
Hidden leaks, poor ventilation, or structural issues could be causing the mold to regrow.
Professionals can identify and fix the root cause, ensuring the mold doesn’t come back.
Lingering Musty Odor
A musty smell that persists even after cleaning is a warning sign.
It often indicates mold is growing in hidden areas like behind walls, ceilings, or vent ducts.
Experts can locate and treat these hidden spots that are impossible to reach with regular cleaning.
Water Damage or Structural Concerns
Signs such as sagging ceilings, soft drywall, or water stains suggest serious damage.
Mold removal in these cases is more complicated and may require repairs.
A professional ensures both the mold and the underlying issues are addressed properly.
Calling a professional in these situations ensures that the mold is removed safely, the source of moisture is fixed, and your bathroom remains healthy and mold-free for the long term.
Quick DIY Checklist for Removing Mold from Bathroom Ceilings
Here’s a simple, step-by-step checklist to make your mold removal process easy, safe, and effective. Use this as a quick reference before and during cleaning:
Preparation:
Wear gloves, goggles, and an N95 mask.
Put on long sleeves and old clothes.
Turn off electricity near lights or fans.
Remove personal items and cover sinks, counters, and fixtures.
Ventilate the bathroom by opening windows or running the fan.
Check for leaks or moisture sources and fix them first.
Cleaning:
Choose the right solution:
Vinegar for light mold
Baking soda paste for deodorizing and mild mold
Bleach for stubborn, non-porous surfaces
Hydrogen peroxide for eco-friendly cleaning
Apply the solution evenly and let it sit for the recommended time.
Scrub gently with a soft brush or non-abrasive sponge.
Rinse thoroughly with water if needed.
Dry the ceiling completely to prevent mold from returning.
Aftercare & Prevention:
Consider repainting with mold-resistant paint if the ceiling paint is old or damaged.
Maintain humidity between 40–50% with a dehumidifier or moisture absorbers.
Improve ventilation: keep fans running 20 minutes post-shower, and open windows regularly.
Keep surfaces dry: wipe down ceilings and walls after long showers.
Use preventive sprays like a light vinegar mist every few months.
When to Call a Professional:
Mold covers more than 10 square feet.
Mold returns repeatedly despite cleaning.
Musty odors persist after cleaning.
There is water damage or structural issues like sagging ceilings or soft drywall.
This checklist condenses all the key steps from preparation to prevention. Keeping it handy ensures you tackle mold safely and maintain a clean, healthy bathroom all year round.
FAQs About Bathroom Ceiling Mold
Here are some of the most common questions readers have about mold on bathroom ceilings, answered in a clear, easy-to-understand way.
Q1: Can I remove mold myself, or do I need a professional?
Small patches of mold can usually be cleaned safely at home using natural or chemical solutions. However, if mold covers more than 10 square feet, keeps returning, or there’s water damage, it’s best to call a professional.
Q2: How long does it take to remove mold from a bathroom ceiling?
Cleaning a small area can take 30–60 minutes, including prep, soaking, scrubbing, rinsing, and drying. Larger areas may take a few hours or require professional help.
Q3: Is bathroom ceiling mold dangerous?
Yes. Mold can trigger allergies, asthma, coughing, and respiratory irritation. Surface mildew is less harmful, but deeper mold growing into drywall or paint can pose a health risk if ignored.
Q4: What’s the difference between mildew and mold?
Mildew is surface-level, often gray or white, and easier to remove. Mold grows deeper into surfaces like drywall or wood, spreads faster, and may require stronger cleaning solutions or professional treatment.
Q5: Can mold return after cleaning?
Yes. Mold will return if the underlying moisture problem isn’t fixed or humidity remains high. Preventive measures like proper ventilation, keeping surfaces dry, and using mold-resistant paint help stop recurrence.
Q6: Are natural solutions like vinegar and baking soda effective?
For light or recurring mold, vinegar and baking soda work well. Vinegar kills most mold species, and baking soda helps remove odor and prevent regrowth. Stronger infestations may require bleach or hydrogen peroxide.
Q7: How can I prevent mold from growing in the future?
Keep humidity between 40–50%.
Run exhaust fans during and 20 minutes after showers.
Fix leaks and cracks in pipes, tiles, or the roof.
Wipe down ceiling and walls after showers.
Use mold-resistant paint or occasional vinegar sprays.